A Quick Word about Self-Taping
Before we go into the things you might need for self-taping, let me first express something important. Taping auditions, especially if you are a relatively new actor, is something that you should seriously consider using a professional service for. It’s not expensive most of the time and very often includes someone to read lines with and coach you. Not to mention that a good taping service will edit your audition video and even upload it to the right place for you. So, if your goal is simply to save a few bucks, just consider the value that you get from using a professional service.
Looking for a place to tape your auditions? Check out our list of services on our page for actor and model resources HERE.
Self-taping auditions can be the best option in certain situations like:
- When you can’t get an appointment at a taping service in time to get an audition submitted
- If you tape a high volume of auditions and it’s costing you a small fortune to pay a service.
- You are an experienced actor and you are looking for an option to tape at home sometimes
- There isn’t a place near you that offers audition taping
In those cases, having the right gear to create audition tapes can be a life-saver. Since many of our clients work in film and television, we decided to put together a list of some of the equipment we have used over the years that would be great for taping auditions. You can break down everything you need into five categories:
1. A Camera
A high quality camera used to be a lot harder to come by, but these days most people carry one around in their pocket. If you are using a smart phone with a high quality camera, you can almost certainly use it for self-taping auditions if you need to.
What you need to know about using a phone:
- Premium smartphones like the iPhone and the Samsung Galaxy have great cameras that will work fine. Some of the lower-end smartphones compromise on the camera quality to make them cheaper so keep that in mind.
- Smart phones have a limited storage capacity. Make sure you have enough room before you start taping. It would be terrible to be in the middle of a great take and your phone’s memory fills up and it stops recording.
- Even though you might want to watch yourself audition, don’t use the front facing (selfie) camera, it is typically much lower quality the the main camera on a phone.
- A phone can get the job done, but you want to up your camera game, consider looking at some of the great options out there for content creators.
The Canon M50
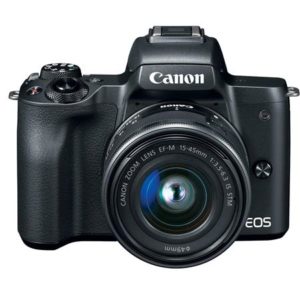
You don’t have to mortgage your house to get a great camera for self-taping. Quality cameras can start as little as $300. Based on experience, here is the camera (as of 2019) that we recommend for auditions. The Canon M50 is an affordable, high quality camera that was made for YouTubers and content creators. It has a ton of great features at a very reasonable price. Here’s why we like it for self-taping auditions:
- Great quality video with good low light capability
- A fully articulating screen that is perfect for self-taping. Makes framing up your shot easier
- Integrated mobile app that you can use to control the camera while you are filming
- Eye-tracking focus that will follow you as you move so that your audition is in focus even if you move around a bit
- Blue tooth capability to transfer pictures and videos to your mobile device automatically
- Ease of use – it even has a built in wizard that guides you through the menu features as you use it
- Intelligent auto mode for video that makes it almost foolproof to use
Don’t forget that to stabilize your camera, you are going to need a tripod. Don’t go overboard, something light, small, and easy to operate like this. Almost any small tripod will do the trick, just make sure that it can handle the weight of the camera you plan to use.
2. Audio
When it comes to producing video, the audio is just as important as the picture. When you are delivering a monologue or reading lines, you want every nuance to come across in just the right way, not as a noisy, garbled mess. If you are serious about taping, then get serious about audio. Here are a couple of options for you:
Boya BY-M1 Wired Lavalier Mic
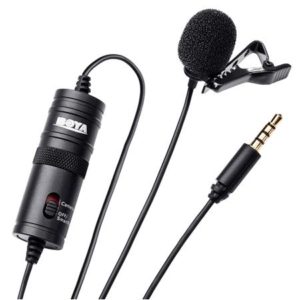
This is probably the simplest solution to get the best results for the least amount of money. One of the reasons that audio can sound so bad using a camera’s built in microphone is that it ends up being relatively far from you when taping and your voice doesn’t stand out as much over the noise. A cheap, wired, lavalier mic will plug right into the camera and clip right onto your clothes. That microphone will be right there with you and cut out the majority of the noise, making your voice stand out nicely.
RODE VideoMicro Compact On-Camera Microphone
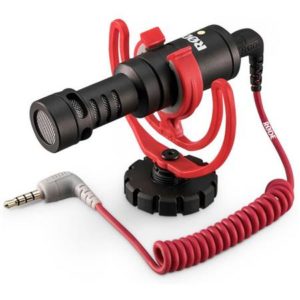
Rode is one of the most respected names in audio and many professional videographers and content creators trust their equipment. They produced this handy, mini version of their much larger and more expensive microphones exactly for people who are looking to improve their audio for online content. The VideoMicro is a directional mic that reduces ambient noise and focuses on the audio in front of the camera, giving you a much better result than the on-camera microphone. This option has an advantage over the lavalier mic because you won’t have to worry about your clothes or body rubbing against the mic while you are taping. Check it out on Adorama, HERE
3. Lighting
Savage 500W Daylight LED Studio Light Kit
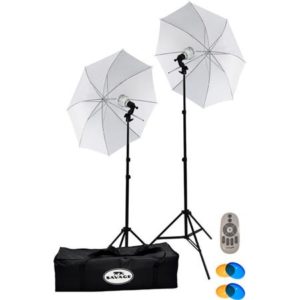
For an audition, you don’t need anything fancy. What you should aim for is flat, even lighting that illuminates both you and the background without creating harsh shadows. There are many, many options out there, including lots of lights that will mount right onto the camera. We don’t recommend using those as they don’t typically give you the right amount or quality of light you need. To get great lighting for an audition, you need more than one light, and you need those lights to be off-camera so they have the distance necessary to get even lighting.
This kit is incredibly affordable, portable, and reliable. We have trusted Savage equipment for years in producing video and highly recommend checking out what they have to offer. This kit with two LED light bulbs, softening umbrellas, light stands, remote control, and a bag to fold it all up in is an amazing value and can set up in just a couple of minutes. Setting these up on either side of the camera will give you soft, even light and a consistent color. View it HERE on Adorama.
4. Background
Studio Essentials 5×6.5 Pop-Up Reversible Background
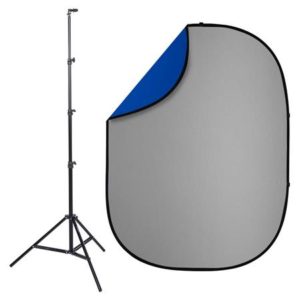
Generally speaking, backgrounds for self-taping auditions just need to be a neutral, solid color. What you don’t want is for it to look like you are taping in front of a dirty old bed sheet that you’ve thumb-tacked to the wall. It can be very difficult to get the wrinkles out of a fabric and make it look good on tape. That’s why we recommend a collapsible backdrop. We use these all the time in our photography work. They combine affordability, portability, and they don’t show wrinkles. This particular kit comes with a light weight stand that sets up in seconds to give you a great-looking solid background every time. The backdrops are even double-sided to give you more options. View the kit HERE on Adorama.
5. Editing
Finally, once your audition is on tape, you are going to need to edit the footage. There are dozens of incredible programs out there, including ones that work on a mobile device.
For Mac Users
Your computer already has a great video editing program built in. iMovie can do everything you need for audition taping and more. Incidentally, it also has a mobile app that you can use to edit your auditions on the go. Quicktime comes pre-loaded on your mac as well and can be pretty handy for a very quick edit with no frills.
For Windows Users
If your editing experience is limited, start with a simple program. Editing auditions is a pretty simple process that doesn’t require an engineering degree.
If you are new to editing, check out Avidemux. It’s a simple and lightweight program with just enough tools to get the job done. You can download HERE.
If you have graduated to something more advanced, check out DaVinci Resolve. Although it has incredibly advanced features, it’s interface is still incredibly intuitive. Download it HERE.
A little more to think about:
There are a crazy number of options out there when looking at AV equipment, as a result, it’s easy to get overwhelmed. Just remember to do your homework, read the reviews, and reach out to your fellow actors to see what is working for them.
Want to check out our full list of recommended equipment for self-taping? Just click HERE to visit our custom Wish List on Adorama.